

How To Download Iphone Notes To Mac
Our iPhones incorporate treasure troves of information jotted down on a daily ground. Sometimes, y'all'll demand to harvest these notes from your iPhone and shop them on Mac for convenience. Space constraints and the untidy app also compel you lot to sync notes from iPhone to Mac .
Furthermore, you lot demand to sync crucial pieces of data every bit an extra layer of security. At that place are many means you can capitalize on to transfer your iPhone notes to Mac quickly and safely. You may run into issues or misadventures on your way which have been covered in this guide.
Today, on this piece, we will teach you how to sync notes from iPhone to Mac with or without iCloud.
Contents: Part one. How to Sync Notes from iPhone to Mac with iCloudPart 2. How to Transfer Notes from iPhone to Mac without iCloudPart 3. Efficient Alternative on Transferring Notes from iPhone to MacPart 4. In Conclusion
People Also Read:How To Sync Contacts From iPhone To MacSyncing Your iMessage To Mac – The Quick And Easy Way
Part one. How to Sync Notes from iPhone to Mac with iCloud
iCloud offers the easiest way to import notes from iPhone to Mac. As a native component of Apple, this feature is available on iOS and macOS. By default, every Apple user has 5 GB of free cloud space, which exceeds the bytes taken up by notes.
At the showtime, toggle on notes backup in the iCloud service and so launch Notes app on Mac to import items. Information technology completes your tasks in a jiffy with a perfect touch.
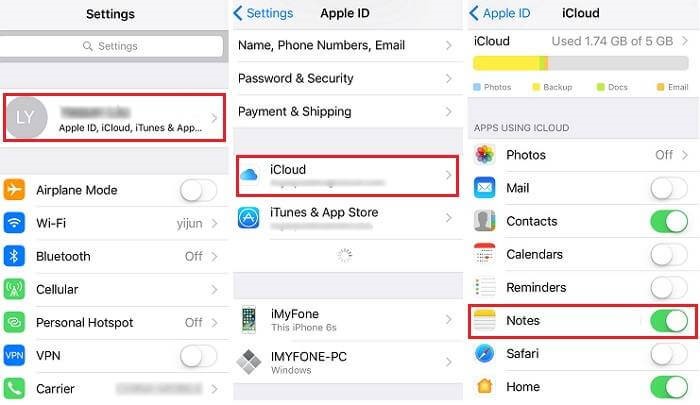
Follow the steps outlined below to sync notes from iPhone to Mac with iCloud:
- Caput to your phone's iCloud settings and click on iCloud.
- Next, fill in your Apple ID and password to log in.
- Scroll for the "Notes" choice and enable it. Confirm you lot've toggled on Notes option nether APPS USING ICLOUD.
- Accordingly, all the notes loaded on your phone sync to your iCloud business relationship automatically.
Retrieve Your Notes
- To access your notes on Mac, open the iCloud desktop app. Log in with like iCloud account data.
- You can open the iCloud app via System Preferences.
- In the iCloud settings, "Notes" should be enabled. In newer versions, it appears nether "iCloud Drive".
- Adjacent, click on the folder you desire to admission.
- And so click File>>Import.
- Choose the detail that you want to retrieve and click on the Import pick.
- You'll come across a confirmation message, simply hit import again.
Alternatively, go to icloud.com and enter your Apple ID to access all the synced notes from your iPhone.
Import Notes from iCloud to Mac
Log in your iCloud business relationship via "System Preferences" on Mac. Then check the option 'Use iCloud for mail, contacts, calendars, reminders, notes, and Safari', hit the push button of "Next" and notes from iOS import to your Mac correct away.
Role ii. How to Transfer Notes from iPhone to Mac without iCloud
You can use third-party accounts syncing your notes to import them from iPhone to Mac.
Sync Notes from iPhone to Mac with Mail
Step 1. Cull ane Particular to import.
Whorl to the Notes app and tap on the notes y'all seek, select the share icon on the upper right corner.
Step 2. Share the particular to your email.
Tap on the "Mail" icon, type the email address and access your business relationship via Mac to extract notes to your desktop.
Import Notes from iPhone to Mac with Tertiary-Party Electronic mail Account
As long as yous know the account with the copies of your notes, you can import them from iPhone to Mac straightforwardly.
Stride ane. Log in the Account that synced your notes.
Toggle on the readings of "Mail, Contacts & Calendars" on your Mac, choose the account with your notes and enter your credentials to sign in.
Pace 2. Import iPhone Notes to Mac.
Afterwards signing into your email, Organisation Preferences prompts y'all to "Select apps you wish to apply with your account. Check out whether "Notes" is enabled or tick its icon where necessary. Striking the "Done" selection to transfer your notes to Mac.
How to Transfer iPhone Notes to Mac via AirDrop
AirDrop is a built-in function developed to support sharing data between 2 devices. You can use information technology to translocate notes from iPhone to Mac by post-obit these steps:
Step 1. Launch AirDrop on iPhone and Mac via Controler Center.
Launch "Control Center", wait for the "AirDrop" icon on both devices and toggle it on. Tick the option "Everyone" on the window of "Allow me to exist discovered by" to make your devices detectable.
Step two. Import iPhone Notes to Mac Straight.
Toggle on the Notes app and cull 1 of the items that you'd similar to import. Click on the share icon on the upper right corner, tap on the "AirDrop" icon and select the recipient Mac. At present, head to your Mac, look a few seconds and check the option of "Take" for the uptake of the notes.
Office 3. Efficient Alternative on Transferring Notes from iPhone to Mac
How to Transfer Notes from iPhone to Mac with FoneDog
FoneDog's iOS Data Backup and Restore doubles every bit a conveyor chugalug to sync information from your iPhone to your reckoner and vice versa. This tool allows y'all to transfer notes in a matter of seconds. Yous can transfer a portion of your notes or bulk.
Furthermore, it doesn't misconstrue your notes and they remain explicable even after the backup.
Here are fast, piece of cake steps to sync Note to Mac.
Step 1. Download and Install Software
Download and open up FoneDog iOS Data Backup and Restore, and then choose the restore iOS data backup to sync notes from iPhone to Mac.
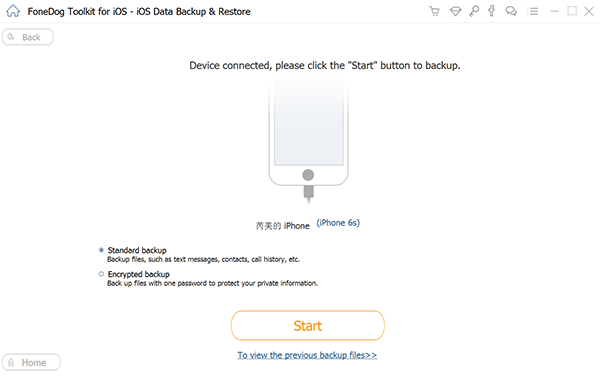
Stride 2. Choose Data Backup Way
Choose between "Standard backup" and "Encrypted fill-in". The encrypted backup requires a password to shield your private information.
Step 3. Choose the Blazon of Data Yous Desire to Back up
After scanning is completed, cull your desired notes to sync to Mac and hit the "Next" button.
Step four. Sit Dorsum every bit the Tool Backs up Your Data
Look for a few seconds and your notes sync to Mac.
Mac Tip: Using PowerMyMac to Remove Old Back upwards Files
PowerMyMac helps you fire up you at full pelt. Information technology offers a quick and safe fashion to erase junk files to free upward space on your Mac. It scans your organization to locate iTunes backup, multi-languages, big or obsolete files and recommends them for removal.
It includes a wellness indicator with readings of your CPU, memory, disk, and battery status. Cluttered Macs run out of steam quickly because y'all've put a strain on memory. Having a cleaning and maintenance tool is a great weight off your mind and saves efforts or time. Give it a shot to continue your automobile tidy and fast.
![]() Go A Free Trial Now!
Go A Free Trial Now!
Part 4. In Determination
Now that you know the ins and outs of how to sync notes from iPhone to Mac, toggle on the Notes app on Mac to see all your wealth of information on the left side. They are all notes synced from your iPhone. To sum upwards, the about practical method to sync your data depends on the accounts enabled and private needs.
Take action and import your notes today with these uncomplicated steps.

How To Download Iphone Notes To Mac,
Source: https://www.imymac.com/mac-cleaner/how-to-sync-notes-from-iphone-to-mac.html
Posted by: karstenexiligh.blogspot.com
0 Response to "How To Download Iphone Notes To Mac"
Post a Comment